“THE ACTUAL INSTALLATION”
Having narrowed down the wish list for how to improve our 12
Volt electrical household of the RV, I went to Leamington’s Canadian Tire, a
box store chain in Canada, a toy store for the man and a Canadian icon. They
had a sale going and I happily pushed a shopping cart, heavy loaded to our RAM
1500 truck. What was in the shopping cart?
1 MotoMaster 80 amp AGM deep cycle group 24 battery
2 MotoMaster 105 amp each AGM deep cycles group 31 batteries
1 MotoMaster Eliminator 1000 W pure sine wave inverter
2 battery boxes with cover and tie down hardware to fit
Group 31 batteries
MotoMaster is a Canadian Tire brand. The AGM batteries are a
quality product and are made for Canadian Tire by Exide Technologies in the
United States.

With all these goodies loaded into the truck I rushed home,
eager to get the tools out and to get started to install everything. First, I removed the wet cell Group 24
battery, which we got with the trailer and gave it to Jim Warren, my neighbor
for his outboard. Jim is a fishing fanatic who used to own a big commercial
fishing trawler on Lake Erie and later on dove under the ice in Northern Canada
to earn his bacon as a commercial diver.
In return Jim gave me his old clunker battery so that I could return it
to Canadian Tire’s “Battery Core Exchange” program for a credit. Jim Warren was happy and I was too.


The new group 24 AGM Battery fit the Jayco supplied battery
box perfectly, but the original cable to the converter, which is mounted underneath
the galley stove, was not up to snuff. It was a gauge #8 SAE automotive wire
with crimped on “el cheapo” battery lugs. The gauge #8 wire was on the very low
end of the permissible size for the current of the converter’s built-in 55amp
3-stage battery charger. A gauge #6 wire in AWG instead of a SAE wire is a
better choice, can handle the produced amps better, has less voltage drop, finer
strands and circa 7 % more circular mil area vice versa a SAE #6 wire.
SAE stands for Society of Automotive Engineers – AWG stands
for American Wire Gauge.

By choosing a marine wire, the fine copper strands are tinned
to resist corrosion which results from salt spray, while driving on plowed
winter roads or near the oceans. Marine wire is the way to go for RVers, when
facing a job of running new wires along a frame or tongue. As for the on the
wire end crimped lugs, I prefer the marine lugs. These lugs are seamless closed
up toward the mounting hole and are tin-plated. Most standard automotive or
industrial type lugs are not seamless and open toward the mounting hole.

seamless lug on the right
These openings will let salty moisture or water into the
wire core, which will start corrosion and you will experience a loss of
conductivity. While we are at this, I like to mention that after you have
crimped a wire to the lug, you should cover the mating point of the wires’
plastic insulation meeting the crimped end of the lug with a sleeve of adhesive
lined heat shrink tubing to waterproof it.
I removed the
manufacturers’ battery wiring and the next thing was to cut a few length of #6
AWG Marine wire to make up new cables. From our boating days I still had a
stash of Ancor Marine wire in different gauges and colors of red, black and
yellow, plus a pile of marine lugs. Three different kinds of crimpers including
the heavy duty one for lugs I had still in my possession from my professional
days before I retired as a self-employed technician specialized in bookbinding
and printing equipment. Because of this profession, I possess a good knowledge
in electronic, electro mechanic, hydraulic, pneumatic and machine shop related
work. This helped me tremendously in building two boats with all the high tech instrumentation,
wiring, steering, engine, etc.
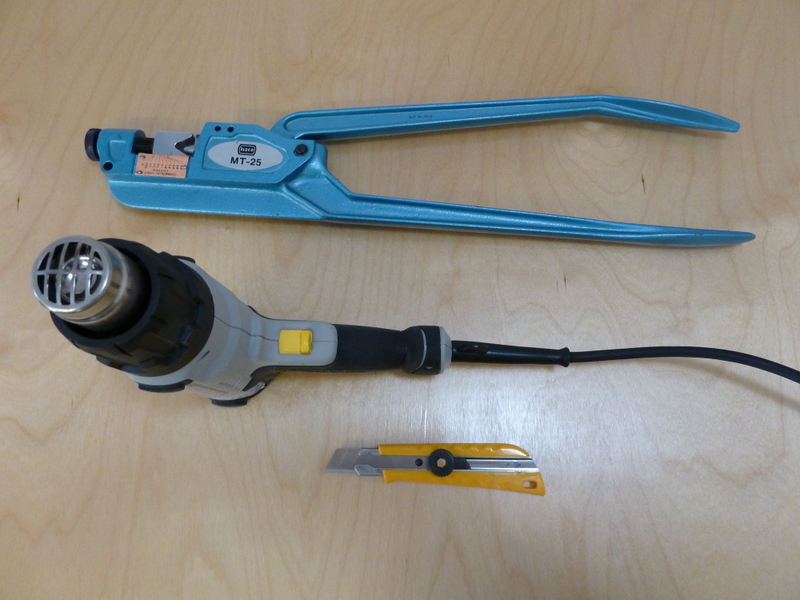
lug crimper, heat gun, box cutter
I needed to cut a small pile of red (positive) and
black/yellow (negative) #6 AWG wires for the battery on the tongue to a point
in the trailer’s storage compartment and from there to the converter under the
stove, plus a few jumper wires for the 2 new to be installed group 31 AGM
batteries. On top of the 2 battery boxes I will piggyback the new inverter, so
I needed to cut a couple of short lengths in black/yellow and red #6 AWG for
that too. The new inverter needed also a cut off switch, so a couple more wires
in red I cut as well. After all the lengths were cut in black/yellow and red, I
crimped the tin plated lugs to the wires after removing ½ inch of plastic
insulation with a box knife. For a neat finish, I covered the wire and lugs
mating area with adhesive line heat shrink tubing.
We now call these wires with heat shrink covered lugs a cable.


West Marine, a “Top Notch” marine store chain, has all the Ancor
marine wires; lugs and heat shrink in stock and supplies a courtesy heavy-duty
crimper for in store use for their clients. They don’t charge any money for
using the crimper. Go and check it out.
By using a DeWalt power drill, I drilled a few half-inch
holes thru the storage compartment’s floor and marked them by sticking a few #14
solid electrical wire cutoffs through, which I had left over from my house
wiring adventures. They will act as a fishing wire to pull the battery cable
through. This job of crawling under the trailer and feeding the red cable I
dedicated to my lovely wife Marlene, while I was sitting in the storage
compartment to pull. Haha!! It worked out fine, she almost got a spider in her
hair. The heavy #6 battery cable later got secured with cable clamps and wire
ties. A black/yellow negative cable got bolted to the frame running from the
tongue to the battery minus post. The same applied to the group 31 AGMs
batteries in the storage compartment, plus we fitted another red positive cable
from the storage compartment to the converter along the trailers’ frame plus a black/yellow
negative cable from the converter to the trailers’ frame, all done in Ancor
Marine #6 AWG wire. It sounds like a lot of wires, but really it isn’t!

Info: The black wire in house wiring is the hot wire in the
120 VAC applications, as you know. Touching a black 12 VDC negative wire is not
life threatening, but it is life threatening when touching a black 120 VAC of the house wire. For this reason
the Marine Industry is trying to change the black color of the negative 12 VDC
wire to the yellow colour for the reason of preventing life threatening mistakes. This can happen while testing or trouble shooting live wire circuits. I bet the RV Industry will follow!

The actual installation was a breeze. Work progressed
quickly. The batteries with the battery boxes I put in position; installed the jumper
cable, negative-to-negative and positive-to-positive. (The technician would
call it parallel, not in series) Fitted the tie down straps for the battery
boxes with the supplied hardware and mounted the 1000 W pure sine wave inverter
on the top of the battery box covers with removable stainless machine screws
and nuts. A pigtail cut off with the fitted plug of a 120 Volt extension cord
was run from the inverter to a new 120 Volt outlet on the galley counter,
secured it with cable clamps and connected it. A supplied inverter control
panel I mounted in a location on the wall, which separates the storage
compartment from the trailers’ interior and connected it with the supplied
cable to the inverter. A simple plug in affair.


This is it; everything is in place, 3 AGM batteries and a
new 1000W pure sine wave inverter with one outlet at the galley counter and an
associated control panel close by.
Now we have a lot more amps at our disposal, which comes
handy to power the inverter when there is nothing to plug in for the RV power cord while at a stopover
on the highway or boondocking in the sticks!!
Future write ups are in the works with thoughts about using
a mounted digital 12 volt meter gauge as an indicator to find out how much juice
is still in the battery bank. Plus, the installation of a Wifi booster with
router to beef up weak incoming wifi signal for your internet, is coming up
soon.
This comment has been removed by a blog administrator.
ReplyDelete