We do like the LED taillights, which most 18-wheelers have
on the towed trailer these days. They are bright, highly visible and when the
driver hits the brakes these LED lights pop right into your eyes. You do notice
the big rig in front of you! Some newer travel trailers and 5th
wheels have them too. They are easily
being seen in the fog, heavy rain or drifting snow, while you are driving on
the highway.
When we purchased our new 2016 Jayco White Hawk 24RKS travel
trailer we noticed Jayco’s inside lighting is all LED, but the outside
clearance, side marker and taillights were the old fashion incandescent bulb
fitted series lights, much to my dismay. This put a damper onto my spirit and I
started to search for a taillight, side marker lights and clearance lights LED
solution.
Jayco is using the Command series of taillights and
clearance lights from Command Electronic Ltd. Schoolcraft, MI. Marlene thinks
that Jayco in Indiana must still have a pile of these older fashion taillights
in stock and wants to work them first off before switching over to LED
taillights.
While searching on the Internet, I noticed that the
taillight manufacturer "Command Electronic Inc." in Schoolcraft, MI has a LED
conversion kit for their #003-81 series taillights. These are the taillights
Jayco has been using for years on 5th wheels and travel trailers incl.
our new 2016 White Hawk 24RKS travel trailer.
The LED conversion kit #K-0026 is DOT approved and fit the bill. It cost only $42 US
plus $14.00 shipping to us in Canada compared to a local RV outfit that is a
saving of over $100 Canadian.
Marlene ordered the kit online at Command Electronic Ltd.
and it was shipped per US Postal Service, arriving in our hands via Royal Mail here
in Canada in less than a week after ordering.
Inside the box were two LED circuit boards, two red
taillight lenses, a bag with screws and another bag with a small clear lens for
the license plate window, plus an installation instruction sheet. The packaging was first class, tight fit with
bubble wrap.
The instructions were simple:
1.
Remove the taillight red lenses
2.
Cut the wire right at the bulb socket
3.
Remove bulb socket with bulb
4.
Connect wire from circuit board to existing wire
per instruction
5.
Mount PC board per instruction
6.
Fit new supplied red lenses.
I started the changeover and was done in an hour. As wire
connector you can use wire marrettes or crimp on copper terminals, which I used.
You may have to pull the wires a little out of the trailer wall for stripping
and crimping. Keep a tube of silicon sealant handy to waterproof the wire
bundle in the borehole after that exercise. I had to do it.
To finish the job, I hooked up the truck, plugged in the
cable connector and tested the new taillights. Wow, super bright, just great!

original Jayco taillight

parcel from Command Electronic with LED conversion kit #K-0026

complete contents of package

lens removed and wires cut per instruction
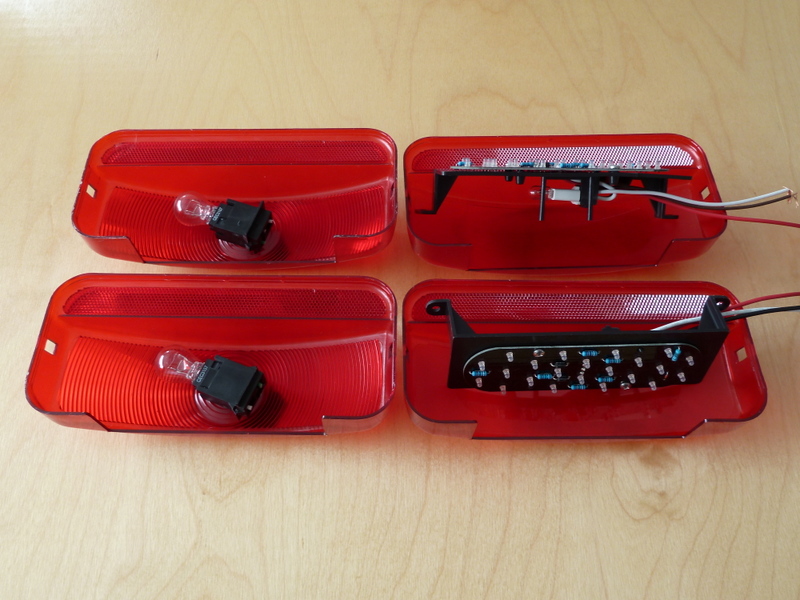
old lens & socket on the left / new lens & circuit board on the right

circuit board wired up

circuit board fitted

new lens installed & LED powered up

taillight powered up during daylight
Watch an upcoming write-up about changing the trailer’s side
marker and clearance lights to LED to compliment the trailer’s LED taillights!
No comments:
Post a Comment